Free Shipping in the US / 30% off all Clothing & Purses / Website Refresh Coming Soon

Ikebana DIY
Posted on
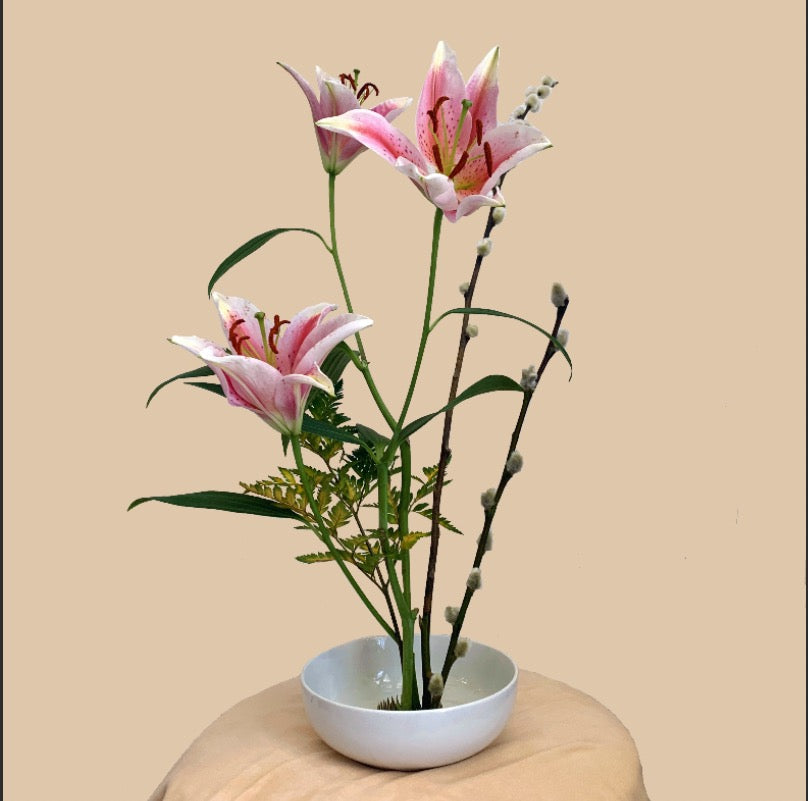
CEO and Creative Director Melissa Hargus shares a beginner friendly and accessible approach to creating an Ikebana Flower Arrangement that's easy to make in quarantine and can even be crafted using flora from around your neighborhood.
What is Ikebana? (pronounced: i·kei·baa·nuh)
Ikebana is a centuries old Japanese art of Flower Arranging that focuses on a minimal and seasonal aesthetic. The word Ikebana loosely translates to "making flowers come alive"
Ikebana in Quarantine:
We believe that now, more than ever we should use this time to self reflect, connect deeper with the natural world and de-stress. Ikebana allows for all of these to come together to create a simple and beautiful reflection.
This DIY is totally beginner friendly and family friendly, requires just a few materials and takes minutes-hours (depending on how long you want to play)
1) Gather Your Materials
-Floral Frog (or see steps at very bottom for DIY alternative)
-Opaque shallow vase or bowl
-At least three floral/foliage varieties
-Scissors or garden sheers
-Rocks or pebbles (optional)
How to Pick Flora:
Color Palette: As a general rule of thumb, and since we are obsessed with color here at Soul Studio, we usually design based on color palette. However due to circumstances you may have more limiting factors (and creativity can fluorish with less options). If thats the case you may pick one "center piece" flower and use greenery for the rest of the arrangement
Shape and Form: Try to pick 3-5 different stems that each have their own "flow" some flora has a straight form, others a more gestural form. Size and shape are also important, think scale. Keep these things in mind, and compare your options.
Tip: During quarantine Florists aren't considered essential businesses and may be closed, additionally Grocery Stores have limited selections. Take a walk around your neighborhood and see what you can find. You can make an arrangement for next to nothing (cost) if you get creative.
2. Crafting your Arrangement:
-Place frog in bowl and add just enough water to cover it (if you're doing the DIY method add water last)
Work intuitively by first examining each stem and admiring the natural shape and form. Here is where we can start to see how our arrangement comes together. Through this mediative process the arrangement almost creates itself.
-Place stems one at a time into the frog: use simplicity, asymmetry, line and form to guide your design
You can always pull a stem out, trim a bit to alter the design, or slightly change the angle/placement. These small changes can visually make a big difference
Also sometimes taking a step back or away from your design can help.
-Add rocks/pebbles if needed to support the weight, and add water if you haven't already at the end to keep your arrangement hydrated
If you're feeling stuck here is a traditional Japanese approach that represents a more spiritual approach to arranging flowers. This style is referred to as Moribana (meaning piling up flowers)
Moribana Style (using three stems)
Representing HEAVEN: Place longest stem at 11 o'clock, this stem should be at least 1.5x the length of the width or height (whichevers longer)
Representing EARTH: Place second longest stem at 8 o'clock, this stem should be 3/4 length of the longest stem
Representing HUMAN: Place third longest stem at 4 o'clock, this stem should be 3/4 length of the second longest stem
And as promised here is a DIY Frog Tutorial:
Things You Will Need
-
Paper cup
-
Scissors
-
Sharp-ended toothpicks/stickpins
-
Decorative stones or rocks
Tip
Floral frogs are devices, usually made of metal, clear glass or acrylic that are used to hold the individual flowers of an arrangement in place. Here's a quick way to makeshift your own if you do not have one handy/don't want to wait for one to arrive in the mail.
-
Cut the bottom inch or so off a disposable paper cup. Save the bottom part and discard the upper portion. A cup with a slight ridge at the bottom works best, as it will be better able to hold weighting stones on its upper surface.
-
Push toothpicks or stickpins through the cut bottom portion of the cup. If using toothpicks, push them through from the cup bottom, which is formerly the side of the cup that would face down if it were filled with water. Pushing the toothpicks through from this direction will ensure that they maintain a sharp tip. If using stick pins, push them through from the other side, which was formerly the cup's interior.
-
Place this makeshift floral frog in the base of the container where it will be used. The sharp ends of the toothpicks or pins and the cup bottom should be facing upwards.
-
Trim the bottom of the toothpicks if they are too long and seem unstable. Be sure to cut the bottom of the toothpicks rather than the top so that the sharp ends are maintained.
-
Arrange decorative stones or rocks on top of the cup bottom or pile the rocks around the whole device to hide the cup and weigh it down.
-
Place flowers on the floral frog as with a regular, reusable frog.
~
Melissa would love to hear about your Ikebana experience, please shoot her an email to share the love:
melissa@wearesoulstudio.com or message us on Instagram: @wearesoulstudio
Quick links
Find Us / Reach Out
Austin, Texas USA
hello@wearesoulstudio.com

Leave a comment: